Fall Makeup Tutorial
Oct 2, 2018
As we move into the season of 50-degree weather and orange leaves piling up outside of school, your make up look has to change with the seasons. Here’s a good step by step tutorial for the perfect fall makeup look.
- Primer, Color correcter, Foundation, and Concealer.
The seasons are changing, and your skin changes with them. Cold weather can dry out your skin and with the humidity and heat of summer out the window, you no longer have to worry about sweating through your foundation. To improve dry skin, find a good moisturizing primer, and for oily skin, find a matte primer. My go-to that’s somewhat in between the two is Benefit’s Porefessional — which fills in open pores and mattifies oilier places of your face without drying it out.
Color corrector is an often forgotten step, but it can make your foundation much more even. Pimples or red spots? Use a green. Bruises or purple under eyes? Use yellow. Yellow discolored spots? Use purple. You can find a wheel of all the colors from brands like Wet n Wild and to brands like Urban Decay and Smashbogo-to go to is Smashbox’s green stick.
After all of this, a good foundation is always the next step. After that, a creamy thick concealer that is lighter than your foundation. After application, take a loose powder and a dry beauty blender and press the excess powder to your under eyes before the concealer starts to crease. If your under eyes look like you got hit in the face with an open bag of flour you’re doing it right. That’s why this is referred to as Baking. Don’t wipe the powder away until after your done with your eyeshadow, so if any flakes of loose eyeshadow fall underneath your eye, it’ll sit above translucent powder and it won’t leave weird colorful smears on your cheekbone.
I cannot stress this enough, however — if you don’t have a face powder, whether it be pressed or loose, do not use a liquid foundation or concealer. Using liquid foundation and concealer without putting powder on top of it will leave your face looking greasy and sweaty, feel slimy, and one misplaced finger on your cheek will be pulled away covered in foundation. Powder is necessary for setting foundation, and without, even the best make up gurus will leave with horrible looking face makeup.
2. Bronzer, Contour, and Blush.
As the weather changes, there’s less sun in the sky so it doesn’t make sense to put as much bronzer on your face as you had during summer. In fall you’re going to look paler naturally, despite your skin tone, so packing on the bronzer is just going to look as fake as the girls who show up to prom looking orange. The cold weather will also leave your cheeks looking more rosy, so putting on a little more blush than you did over the summer will make sense. Contour is optional, as most of these steps are, and if you don’t feel comfortable, don’t do it, but if you’re planning to, use a light feather brush so you don’t over do it.
3. Eyeshadow
The most important part in making your look fall themed is your eyeshadow colors.
Warm browns, burnt oranges and copper or gold shimmer shades are your essentials. Amazing palettes specifically for fall looks is Smashbox’s “Ablaze” and a cheaper alternative, Morphe’s “Ring the Alarm” both featuring warm colors perfect for fall.
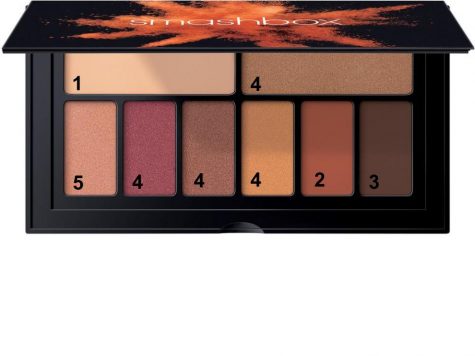
The best order to do it is featured to the side. Apply an eyeshadow primer to make sure it doesn’t crease and stays put all day. Spread 1 all over the lid, covering all areas reached by the primer. Add 2 to the crease and blend it out, and then use a denser brush to pack 2 into a smaller portion of the crease so it gets darker as you move in. Place 3 with the dense brush to the outer corner of your eye, blending it out slightly and in toward the middle of the eyelid. You can vary your look by using any of the 4 shades from the inner corner of your eye out towards the browns and oranges. Finally, add shade 5 to your inner corner for a pop. Once you’re finished, now is the time to take a dense face brush and flick away the excess baking powder from under your eyes. Don’t be afraid to go in a little rough to make sure it all dusts off.
4. Eyeliner, Mascara and Eyebrows
Eyeliner is the most important step in any 21st century eye look. With the warm toned look, a brown eyeliner might make it easier to change up a normal makeup look. Brown or Black would work, and maybe even a burnt orange if you can find it. An intense mascara or possibly fake lashes are a step not to forget about. Dusty eyelashes are not a look. Eyebrows are important, as always, and my personal favorite method is to take a small angled brush and a eyebrow paint pot, as it makes your eyebrows look a lot darker and pigmented than they would with an eyebrow pencil. Follow the natural lines of your eyebrows, flick it out at the end and use the excess paint on the brush to add to the flat front of your brow. It should go from lighter to darker in terms of pigmentation, lighter on the inner side, and darker on the outer side.
Last but not least — don’t forget setting spray so if some pumpkin spice latte spills down your chin, your perfect fall make up look will survive.